Understanding Lazy Susan Cabinet Door Hinges

Let’s face it, lazy Susans are amazing. They’re the culinary equivalent of a well-oiled machine, smoothly dispensing spices, condiments, and enough questionable jarred goods to last a small apocalypse. But their hinges? Those are a different story. They’re the unsung heroes (or villains, depending on their current mood) of this spinning culinary marvel. Understanding their quirks is key to keeping your lazy Susan spinning smoothly, and your sanity intact.
How to adjust lazy susan cabinet door hinges – Lazy Susan cabinet hinges are a unique breed, designed to withstand the constant rotation and weight of those often-overstuffed shelves. Unlike standard cabinet hinges, they have to accommodate both the door’s movement and the carousel’s spin. This added complexity leads to a few more potential points of failure.
Types of Lazy Susan Cabinet Hinges
There are several types of hinges used on lazy Susans, each with its own strengths and weaknesses. Think of it like choosing a superhero for your cabinet: some are strong and sturdy, others are nimble and precise, and some…well, some are just plain quirky. The most common types include full overlay hinges, half overlay hinges, and inset hinges. Full overlay hinges completely cover the cabinet face when closed, half overlay hinges partially cover the face, and inset hinges are completely recessed into the cabinet. Each type requires a slightly different installation and adjustment process. Furthermore, the material can vary (brass, steel, zinc alloy) affecting both durability and appearance.
Common Problems with Lazy Susan Cabinet Door Hinges
Ah, the joys of troubleshooting! Common issues range from the mildly annoying (a slightly sticky spin) to the downright infuriating (a door that refuses to close, or worse, falls off completely!). Sagging doors, misaligned doors, doors that don’t close properly, and hinges that squeak or bind are all frequent culprits. These problems are often caused by improper installation, wear and tear, or simply the weight of your impressive collection of vintage ketchup bottles.
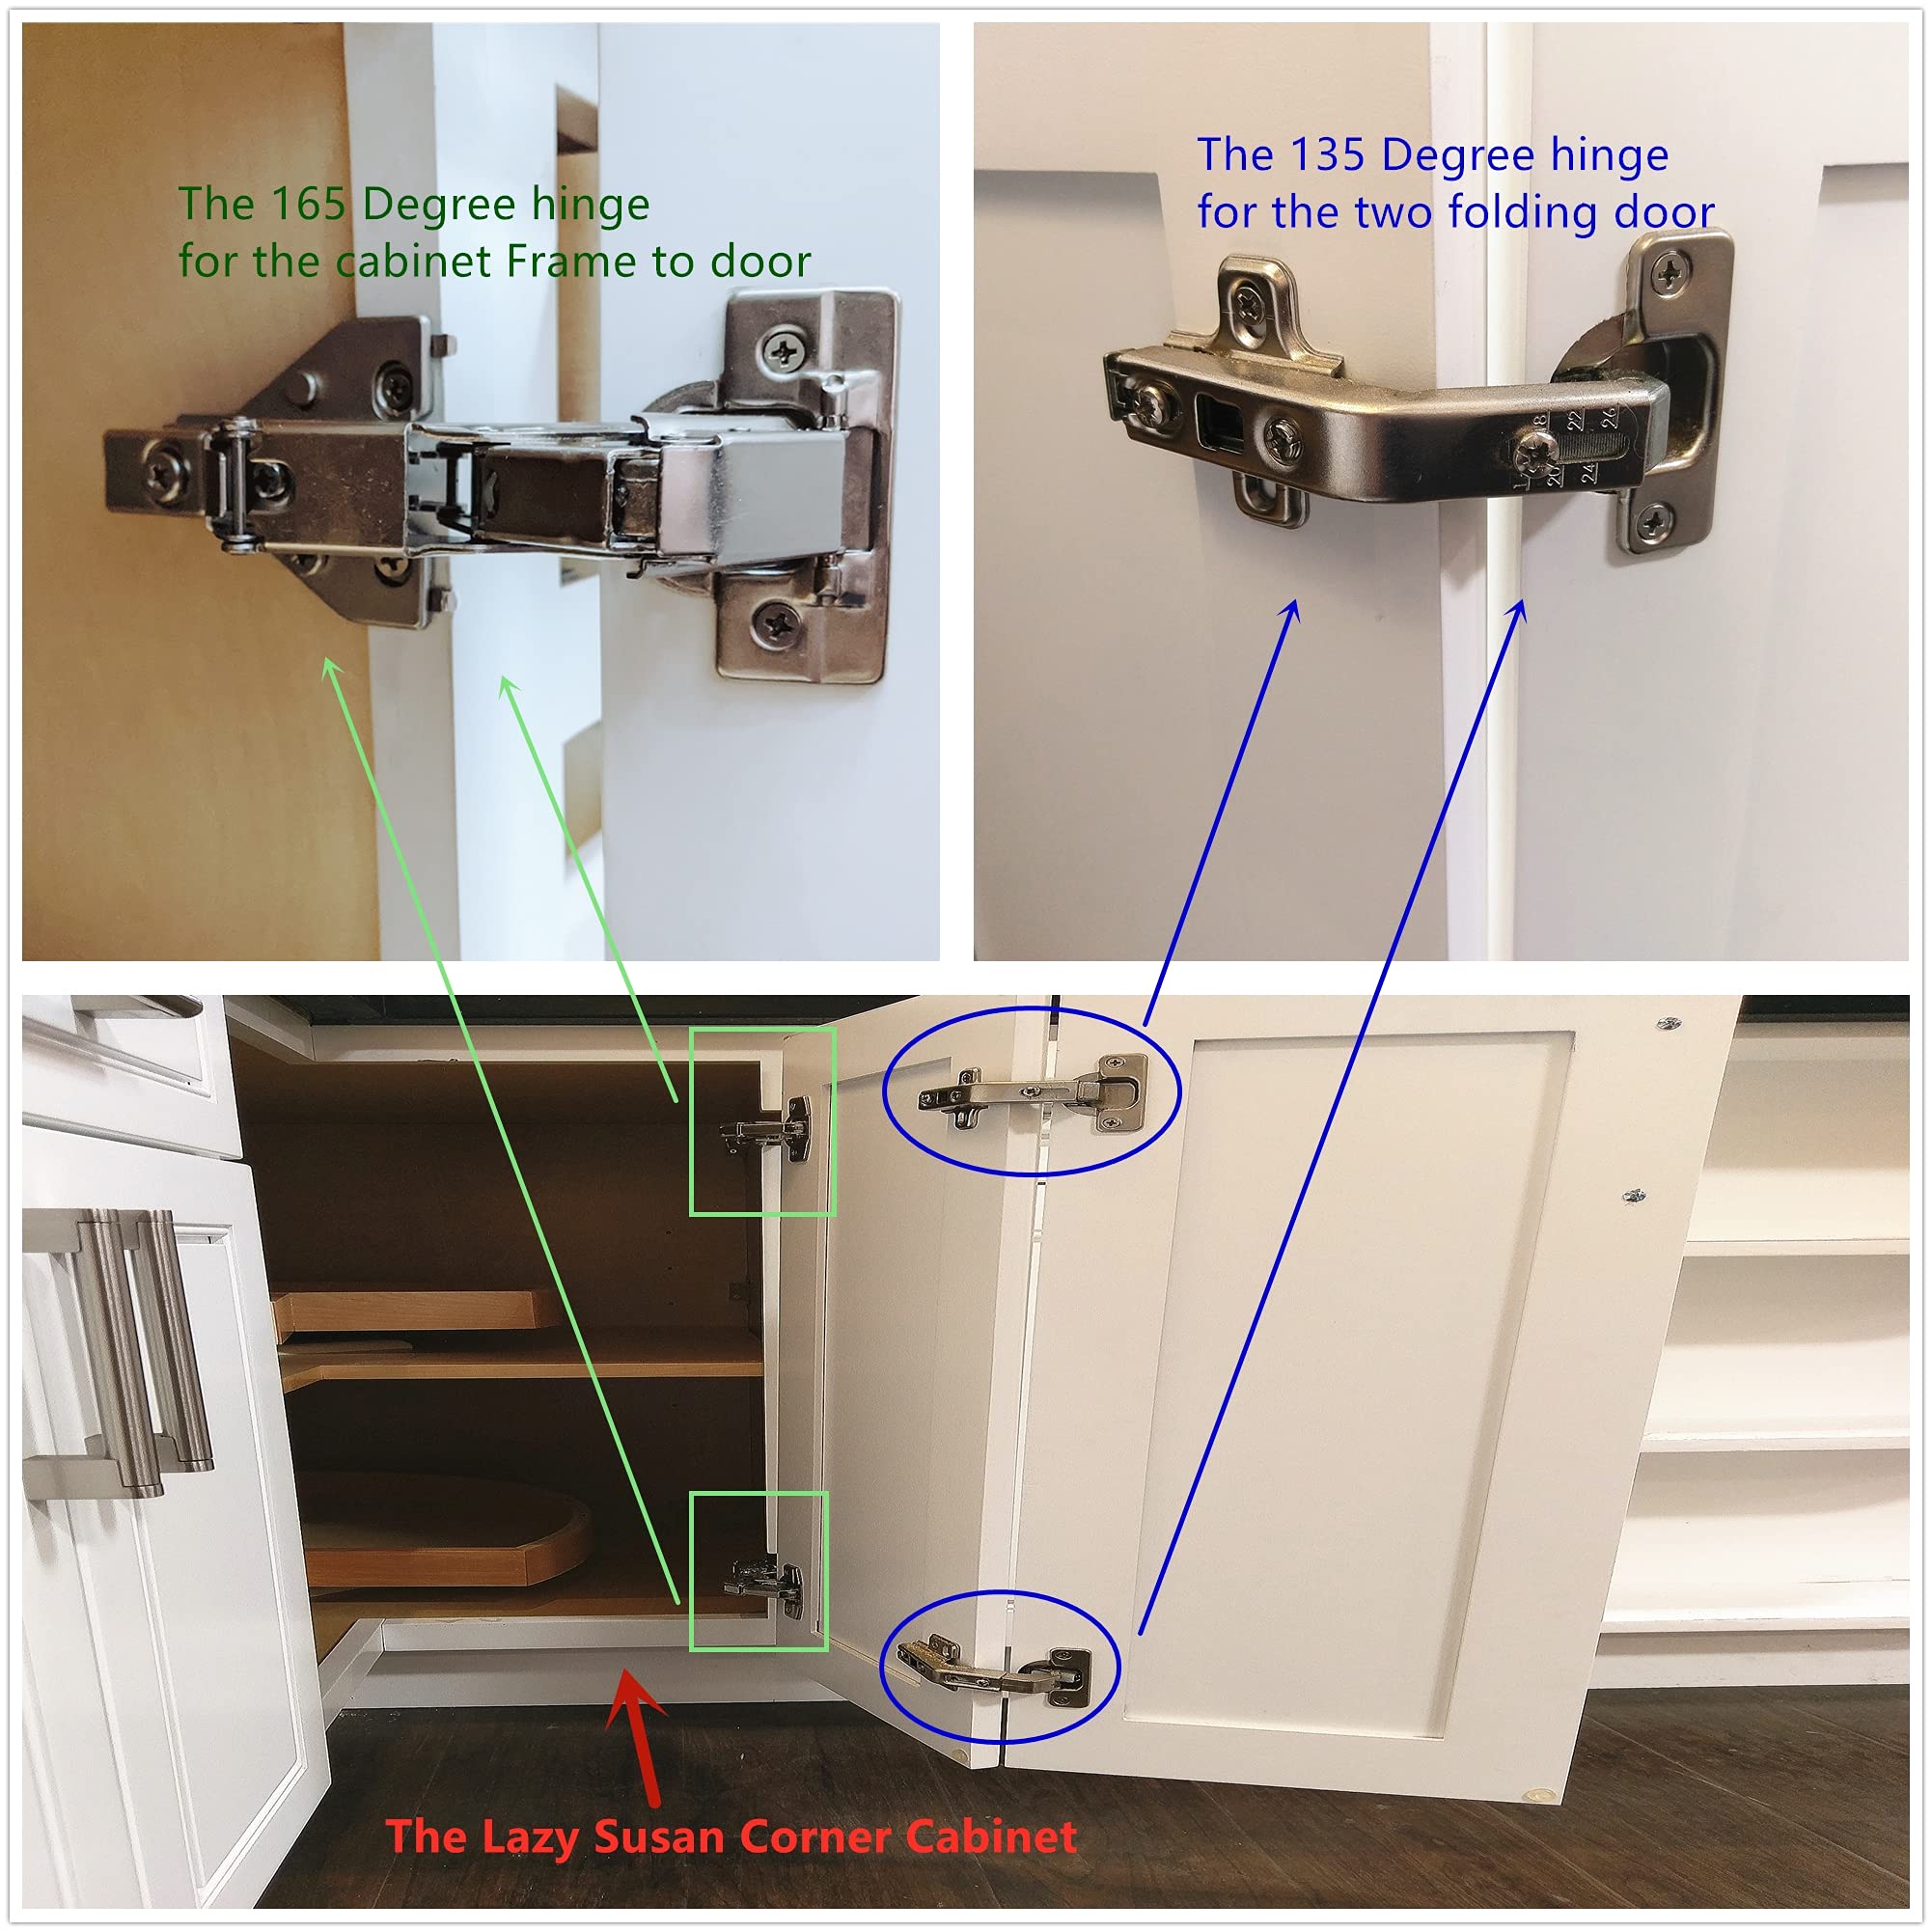
Identifying Your Lazy Susan Hinge Type
Identifying your specific hinge type is the first step to solving any problems. It’s like figuring out the villain’s weakness before you can defeat them. Start by carefully observing the hinge. Note the type of mounting (full overlay, half overlay, or inset), the material it’s made from, and the overall design. Take a close look at the adjustment screws; their location and type will also help you identify the hinge type. If you’re still unsure, a quick Google image search of “lazy susan hinge types” along with a description of your specific hinge can usually yield the answer.
Comparison of Lazy Susan Hinge Types
Here’s a handy table summarizing the different types, their materials, adjustment features, and common issues. Remember, this is not an exhaustive list, but it covers the most common types.
| Hinge Type | Material | Adjustment Features | Common Issues |
|---|---|---|---|
| Full Overlay | Steel, Zinc Alloy, Brass | Multiple adjustment screws for depth, height, and side-to-side alignment | Sagging, misalignment, binding |
| Half Overlay | Steel, Zinc Alloy | Typically fewer adjustment screws than full overlay hinges | Similar to full overlay, but often less robust |
| Inset | Steel, Brass | Limited adjustment options, often requiring precise installation | Difficult to adjust, more prone to damage if not installed correctly |
| Soft Close | Various | Built-in dampening mechanism for smooth closing | Mechanism can fail, requiring replacement |
Adjusting Lazy Susan Cabinet Door Hinges: How To Adjust Lazy Susan Cabinet Door Hinges
So, your lazy Susan doors are acting more like lazy Susans who’ve decided to permanently embrace the “lazy” part of their name? Don’t despair! With a little patience (and maybe a swear word or two whispered under your breath), you can get those doors swinging smoothly again. This isn’t brain surgery, but it does involve tiny screws and even tinier tolerances, so let’s proceed with the precision of a seasoned neurosurgeon… or at least a moderately skilled DIY enthusiast.
Hinge Screw Adjustments for Door Alignment
Minor alignment issues are often easily fixed by tweaking the hinge screws. Think of these screws as the tiny, yet mighty, conductors of your cabinet door orchestra. Each screw has a specific role to play in controlling the door’s position. The screws on the hinge’s mounting plate typically allow for vertical and horizontal adjustments. Tightening a screw on the top of the hinge will pull that part of the door upwards, while tightening a screw on the bottom will pull it downwards. Similarly, tightening a screw on the outside edge will pull that edge inwards, and vice-versa. It’s a delicate dance, but with careful adjustments, you’ll have your doors in perfect harmony. Experimentation is key, but remember, a little goes a long way! Over-tightening can strip the screws or damage the wood.
Adjusting Hinge Position to Correct Misalignment
Sometimes, simply adjusting the screws isn’t enough. If the door is seriously off-kilter, you may need to adjust the hinge’s position itself. This usually involves loosening the hinge screws, slightly shifting the hinge on its mounting plate, and then retightening the screws. Imagine the hinge as a tiny, adjustable slide; carefully move it up, down, left, or right until the door aligns perfectly. This is where a helper might come in handy – one person to hold the door steady while the other adjusts the hinge. Remember to keep track of how much you move the hinge to avoid making things worse. It’s like playing a game of microscopic Jenga – one wrong move and the whole thing could come crashing down (or at least your cabinet door will hang crooked).
Resolving Sticking or Binding Doors
A sticking or binding door is the culinary equivalent of a soufflé collapsing – a tragedy of epic proportions. The culprit is often friction between the door and the cabinet frame, or perhaps the door itself is warped. Before resorting to drastic measures (like buying a new cabinet), check for obstructions like paint build-up or debris. A little sanding or scraping might be all it takes to restore the door’s smooth operation. If the problem persists, you might need to adjust the hinge position (as described above) to create a bit more clearance. Also, inspect the door for any warping or damage that might be causing it to bind. In some cases, a slight adjustment of the cabinet’s frame may be necessary, but this is best left to experienced professionals unless you’re a seasoned DIY warrior.
Visual Guide to Hinge Adjustment Points
Let’s imagine a typical hinge. It’s usually comprised of two plates joined by a pin. Each plate has a set of screws. Picture the hinge from the side. The top and bottom screws on each plate control vertical alignment. Tightening the top screw pulls that section of the door up; the bottom screw pulls it down. Now picture the hinge from the front. The screws on the outer edge of each plate control the inward/outward alignment. Tightening the outer screw pulls that edge of the door inwards; the inner screw pulls it outwards. This applies generally, though specific hinge designs may vary slightly, but the principle remains the same: careful, incremental adjustments are your friends.
Troubleshooting and Maintenance

So, your lazy Susan is acting lazier than a sloth on a Sunday afternoon? Don’t despair! While these rotating wonders of kitchen cabinetry are usually pretty reliable, they can occasionally throw a wrench (or rather, a wobbly shelf) into your culinary operations. Let’s get to the bottom of it – or rather, the bottom of your cabinet.
We’ll explore the common culprits behind lazy Susan malfunctions and provide you with some surprisingly straightforward solutions. Think of this as a self-help guide for your spinning spice rack – no expensive repairman needed!
Loose Screws and Worn Hinges
Loose screws are the number one enemy of a smoothly operating lazy Susan. Over time, the constant rotation and weight of your stored goods can loosen even the most tightly secured screws. Worn hinges are another common culprit. Imagine those hinges as tiny, tireless athletes; after years of spinning, they deserve a little TLC. Ignoring these issues will only lead to sagging doors, doors that won’t close properly, and potentially even a dramatic cabinet collapse (we’ve all seen the movies!).
- Problem: A door is sagging.
- Solution: Tighten all screws on the hinge plates and the door itself. If the screws are stripped, you may need to fill the holes with wood glue and toothpicks before reinstalling larger screws.
- Problem: A door won’t close properly.
- Solution: Check the alignment of the hinges and ensure the doors are not hitting each other or any obstructions. You might need to adjust the hinge screws to fine-tune the alignment. If the hinges themselves are damaged, replacement is your best bet.
- Problem: The entire lazy Susan is wobbly.
- Solution: Check the mounting screws securing the lazy Susan to the cabinet. Tighten or replace them as needed. If the problem persists, it’s possible there’s an issue with the cabinet’s structural integrity, requiring a more involved repair.
Troubleshooting Guide
Let’s get practical. Here’s a quick guide to help you diagnose and fix those pesky lazy Susan problems.
- Problem: Door is sticking or binding.
- Solution: Check for obstructions (spilled spices, rogue utensils). Lightly lubricate the hinges with a silicone-based lubricant (WD-40 is generally not recommended for hinges as it can attract dust and grime).
- Problem: Door is rattling.
- Solution: Tighten all screws on the hinges and door. If the rattling persists, consider adding small felt pads or rubber bumpers to dampen the vibrations.
- Problem: The lazy Susan spins too freely or too tightly.
- Solution: Most lazy Susans have adjustment screws that control the tension. Locate these screws (usually on the bottom or side of the unit) and adjust them to achieve the desired spin resistance. If you can’t find adjustment screws, you might need to consult your cabinet’s instructions or seek professional help.
Adjusting Lazy Susan Cabinet Door Hinges: A Simplified Approach, How to adjust lazy susan cabinet door hinges
Forget complicated instructions. Here’s how to adjust those hinges, explained simply:
1. Identify the Problem: Is the door sagging, not closing, or misaligned?
2. Locate the Screws: The hinges will have small screws on the sides or top/bottom.
3. Adjust Carefully: Use a screwdriver to gently tighten or loosen these screws. Small adjustments make a big difference. Tightening screws usually pulls the door closer to the cabinet. Loosen them to give the door more space.
4. Test and Repeat: Close and open the door repeatedly to check the adjustment. Repeat steps 3 and 4 until the door functions correctly.
5. Celebrate Your Success: You fixed it! Now go enjoy your perfectly functioning lazy Susan.

